 Save
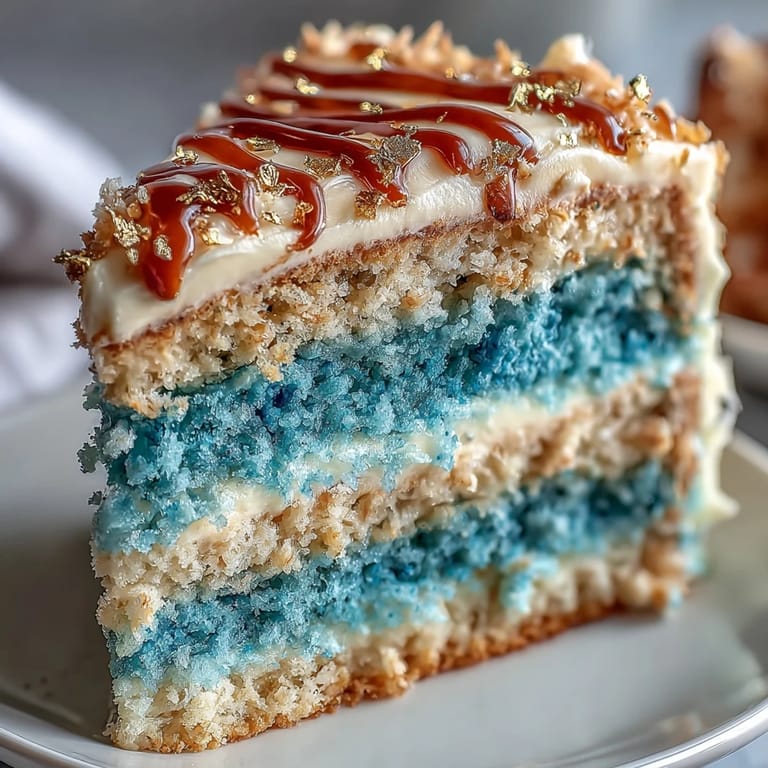
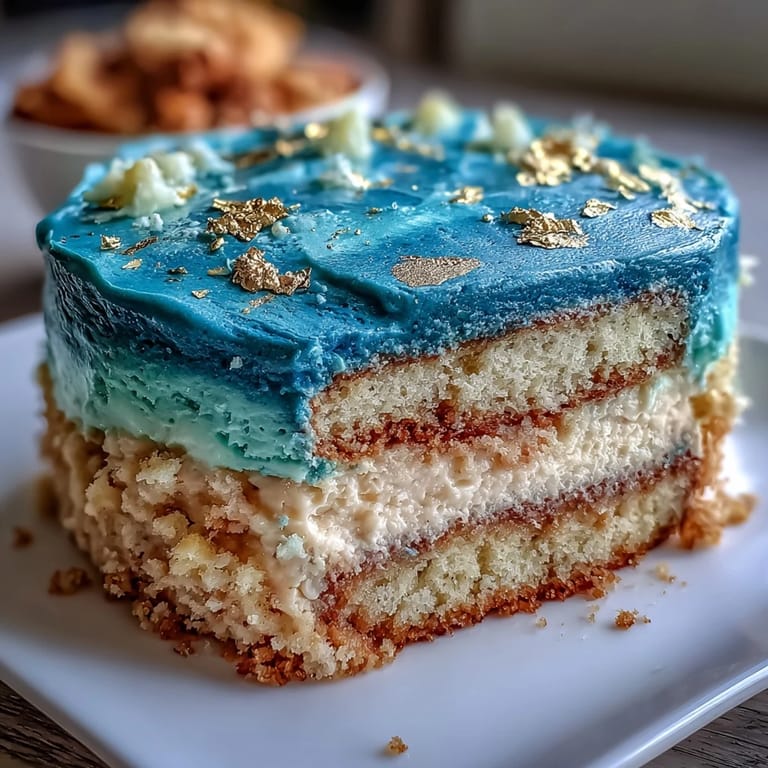
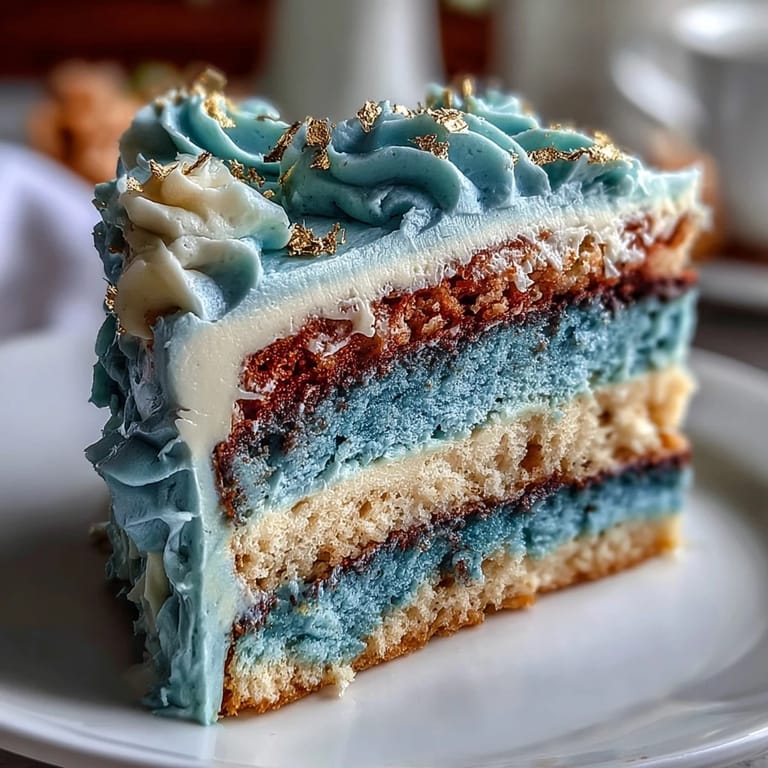
Save Lately, the scent of vanilla and the sight of gold leaf scattered across my kitchen counter have become my unofficial signals of celebration. The first time I made this dark blue and gold ombre graduation cake, there was a quiet thrill each time I mixed a new shade of blue into the batter. Watching the layers bake and rise, I caught myself humming—probably because nothing feels more festive than bursts of color and buttery clouds of frosting. This cake brings a little drama and a lot of joy, perfect for those moments where every slice means something special. Plus, the gold accents are just as fun to apply as they are striking to see.
The last time I made this for my cousin’s graduation, we ended up laughing over crumb coats and sneaking spoonfuls of buttercream. As soon as the finished cake hit the table, every phone in the room was pointed at it. There were congratulations and group photos, but my favorite moment was when someone quietly asked for a second slice—proof that the cake wasn’t just for show. Even after the party, leftovers packed up for the drive home felt like edible medals for a day well earned. This cake has a way of making milestones taste sweeter.
Ingredients
- All-purpose flour: Gives the cake structure; sifting before measuring makes for lighter layers.
- Baking powder and baking soda: Help the cake dome up and stay airy, but don’t overdo it or layers might crack.
- Salt: Enhances flavor—don’t skip, even in sweet recipes.
- Unsalted butter: Needs to be fully soft for creamy batter and smooth buttercream.
- Granulated sugar: Forms the base of sweetness; creaming it thoroughly with butter is key.
- Eggs: Bind everything and give richness; room temp eggs mix better.
- Pure vanilla extract: Adds warmth; use real vanilla for depth.
- Whole milk: Makes layers tender; gently pour to avoid splashes!
- Blue gel food coloring: Gel colors won’t water down the batter and allow for vivid shades.
- Powdered sugar: Sift for lump-free buttercream.
- Milk or cream: Adjusts frosting consistency—start slow.
- Edible gold leaf or gold dust: Instantly elevates the look; handle with dry tweezers for precision.
- Clear alcohol (for gold dust): Vodka or lemon extract works; brush gently to avoid streaks.
Tired of Takeout? 🥡
Get 10 meals you can make faster than delivery arrives. Seriously.
One email. No spam. Unsubscribe anytime.
Instructions
- Prepare the pans:
- Grease and line three 8-inch cake pans with parchment, smoothing out any wrinkles for clean release.
- Mix dry ingredients:
- Whisk flour, baking powder, baking soda, and salt in a bowl—watch the little cloud rise as you stir!
- Cream butter and sugar:
- Beat together until pale and fluffy; you’ll hear a change in sound as it thickens.
- Add eggs and vanilla:
- Crack eggs in one at a time, blending well after each; the mixture should look satiny.
- Combine wet and dry:
- Alternate adding the flour mixture and milk, starting and ending with flour; scrape the bowl to get every bit mixed.
- Tint and divide batter:
- Split batter into three bowls and tint each with blue food coloring—from light sky to deep navy—take your time blending shades.
- Fill and bake:
- Pour each batter into its pan, gently spread tops, and bake until a toothpick comes out clean, about 25–30 minutes.
- Cool the layers:
- Let cakes rest in pans for 10 minutes, then flip onto racks; they smell amazing at this point.
- Make buttercream:
- Beat butter until creamy, then slowly add powdered sugar; mix in vanilla, salt, and milk until smooth and spreadable.
- Tint buttercream:
- Set aside some buttercream for the crumb coat, then color the rest with dark blue gel for final frosting.
- Assemble layers:
- Level the cakes, stack from darkest to lightest blue, adding buttercream between each.
- Apply crumb coat:
- Spread a thin layer of reserved buttercream all over and chill to set.
- Final frost in blue:
- Use dark blue buttercream for a sleek finish, gently blend up to lighter tones for ombre if you’re feeling bold.
- Add gold accents:
- Carefully apply edible gold leaf or dust; a small brush or tweezer helps for fine streaks.
- Chill and serve:
- Once decorated, refrigerate until ready—admire your masterpiece!
 Save
Save There was a moment, after the candles were blown out, where everyone stood back to take in the cake—each layer revealed just by a tiny slice. It turned into a conversation about favorite colors and achievements, making the dessert feel like a centerpiece for our memories. Cakes like this become a marker for what’s next in life, but also a celebration of the path behind. It’s amazing how a bit of edible gold draws everyone together around the table. That night, nobody wanted to leave the last piece untouched.
Choose Your Ombre Adventure
Making the ombre effect is creative—sometimes I play with four or five layers, tweaking each tint so every cut brings a surprise. Blending gel coloring gently means fewer streaks, and a tiny drop can shift a shade dramatically, so go slow. If you want sharper transitions, freeze layers briefly before stacking. Don’t worry if colors aren’t perfect—imperfection adds charm.
Decorating Like a Pro
Applying the gold leaf takes patience and a steady hand; sometimes I use clean tweezers just for those fine edges. If you’re using gold dust and vodka, brush it on lightly to avoid pooling. Graduation-themed toppers or chocolate stars add fun touches but keep them food-safe. Try to decorate over parchment for easy cleanup—you’ll thank yourself later.
Party-Ready Serving Suggestions
Slicing this cake is easiest with a warm serrated knife wiped clean after each cut; that way, layers stay crisp and color doesn’t bleed. Pair a slice with sparkling apple cider or chilled Prosecco for a toast that matches the mood. Fresh berries on the side add bright flavor and look extra special.
- Keep the cake chilled until 15 minutes before serving.
- If traveling, secure with bamboo skewers and wrap loosely.
- Check packaging on gold decorations for allergy info before using.
 Save
Save Making this graduation cake is as joyful as eating it. It brings celebration to life—no matter whose milestone you’re marking.
Recipe Questions & Answers
- → How do I achieve the ombre effect in the cake layers?
Divide the batter into separate bowls and tint each with increasingly deep blue shades before baking. Stack them from darkest to lightest for a gradient effect.
- → What is the purpose of the crumb coat?
The crumb coat helps seal in loose cake crumbs and provides a smooth base for the main buttercream layer. Chilling after this step ensures a clean finish.
- → Can I substitute gold leaf with another decoration?
Yes, edible gold dust mixed with clear alcohol can be brushed on for a similar effect. Chocolate stars, fresh berries, or cake toppers also work well for decoration.
- → What tools are needed for assembling the cake?
You'll need three round cake pans, an electric mixer, mixing bowls, an offset spatula, parchment paper, and an optional cake turntable.
- → How should I store the finished cake?
Keep the cake chilled until ready to serve. This preserves the buttercream texture and maintains the ombre effect and gold decorations.
- → Are there any allergen considerations?
This cake contains wheat, eggs, and dairy. Some gold decorations may include additional allergens; check packaging before use.