 Save
Save I stumbled onto this combination during one of those 'clean out the fridge' evenings when I had leftover rotisserie chicken and a jar of artichokes I'd forgotten about. The smell of warm pita bread filled my tiny apartment kitchen, and I remember standing there, watching the cheese bubble through the oven door, genuinely excited about lunch on a random Tuesday. My roommate wandered in, attracted by the aroma, and we ended up eating them standing up at the counter because neither of us wanted to wait for proper plates.
Last summer, I made a batch for a beach picnic with friends, and I'm still hearing about them months later. There's something magical that happens when the warm, seasoned filling mingles with the slightly toasted inside of the pita. Someone actually asked for the recipe while chewing, which I consider the highest possible compliment.
Ingredients
- Chicken: Rotisserie chicken works beautifully here and saves so much time
- Artichoke hearts: Canned ones are perfect, just drain them really well
- Fresh spinach: Chop it small so it distributes evenly throughout the filling
- Greek yogurt: Creates that irresistibly creamy texture we all crave
- Light mayonnaise: Balances the tang of the yogurt without overwhelming
- Mozzarella cheese: Shredded it yourself for the best melt
- Parmesan cheese: Adds that salty, umami depth that ties everything together
- Garlic: Fresh minced, never powdered, makes all the difference
- Pita breads: Whole wheat adds a nice nuttiness but regular works perfectly too
Tired of Takeout? 🥡
Get 10 meals you can make faster than delivery arrives. Seriously.
One email. No spam. Unsubscribe anytime.
Instructions
- Preheat your oven to 375°F (190°C):
- This temperature melts the cheese perfectly while warming the pita through without drying it out.
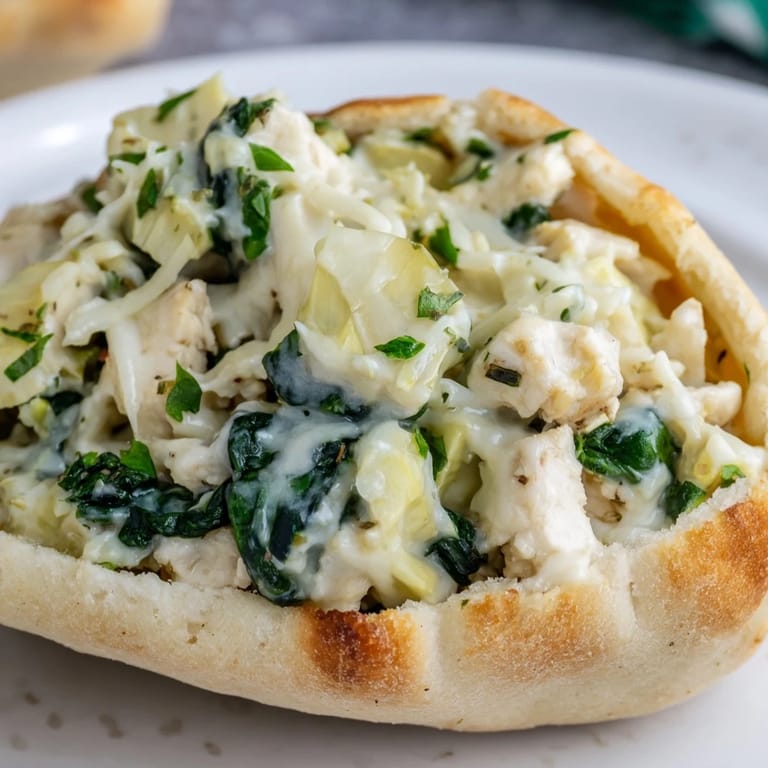
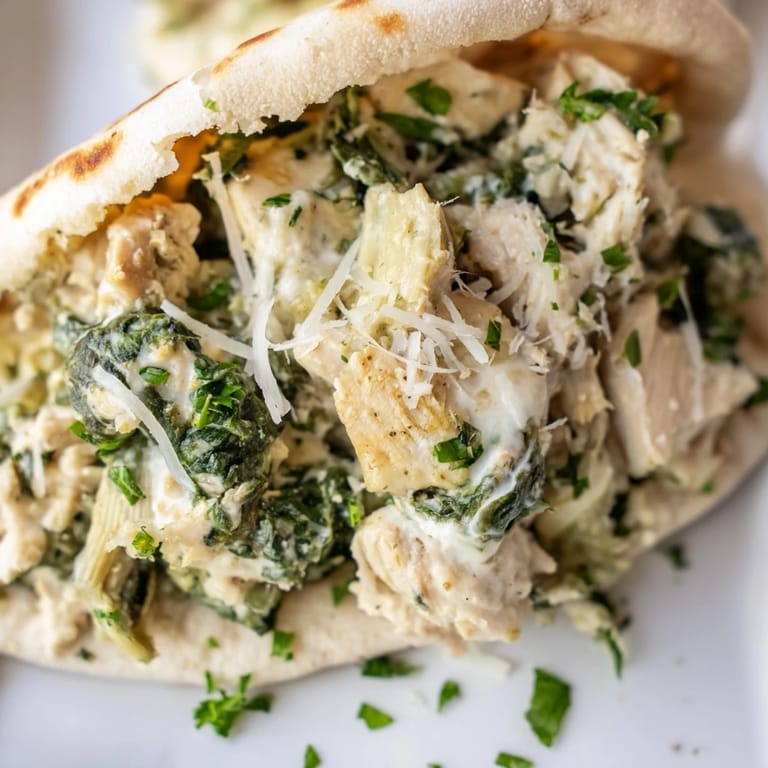
- Mix the filling:
- Combine everything except the pitas in a large bowl, folding gently until the chicken is evenly coated in that gorgeous creamy mixture.
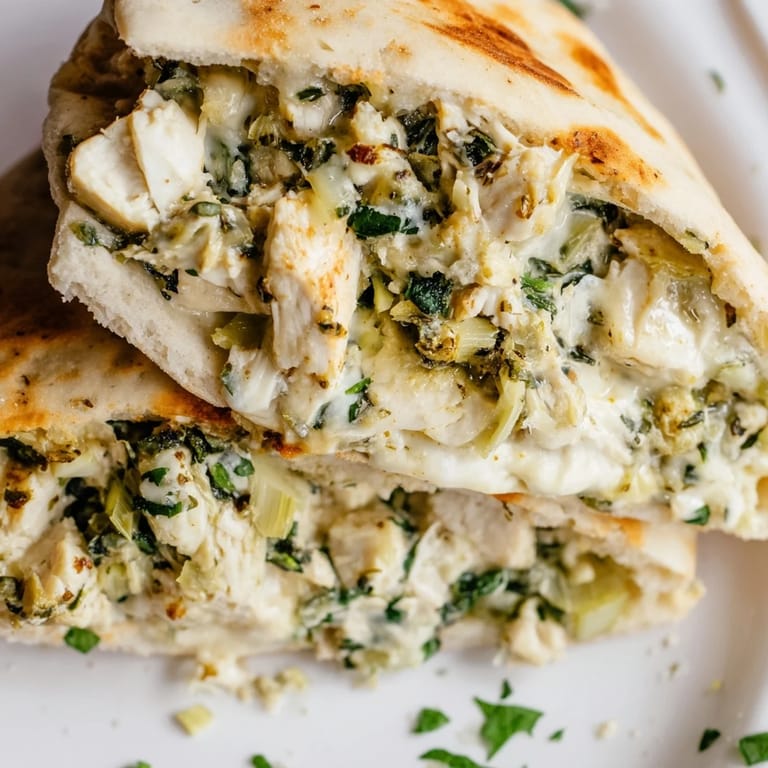
- Prep the pitas:
- Carefully slice each pita in half to create pockets, taking care not to tear through the bottom.
- Stuff generously:
- Use a spoon to fill each pita half, pressing the filling in gently to maximize capacity.
- Bake until golden:
- Arrange on a parchment-lined baking sheet and bake for 15 to 20 minutes until the cheese is melted and bubbling.
- Finish and serve:
- Let them cool for just a minute, then scatter with fresh parsley and serve alongside lemon wedges for squeezing.
 Save
Save These have become my go-to when friends drop by unexpectedly because they look impressive but come together so quickly. I love how the filling peeks out slightly as everything bakes, getting those gorgeous golden edges that make everything taste better.
Making Them Your Own
Sometimes I swap in cream cheese for the Greek yogurt when I want something richer and more indulgent. The filling also works beautifully on its own as a dip, just serve it with crackers or sliced baguette.
Perfect Pairings
A crisp green salad with a bright vinaigrette cuts through the creaminess perfectly. I also love serving these with roasted vegetables or a simple tomato cucumber salad on the side.
Meal Prep Magic
The filling actually tastes better after a day in the refrigerator, so I often double the recipe and keep some unstuffed for quick lunches throughout the week. You can freeze the filled pitas before baking, then just pop them in the oven when you need them.
- Wrap individual portions tightly before freezing
- Bake from frozen, adding about 5 extra minutes
- They reheat beautifully at 350°F for 10 minutes
 Save
Save There's something so satisfying about tearing into a warm, stuffed pita and having all those flavors spill out. Hope these become a regular in your kitchen rotation too.
Recipe Questions & Answers
- → Can I use leftover chicken for this dish?
Yes, leftover cooked chicken works perfectly. Rotisserie chicken adds excellent flavor, or use any cooked breast meat you have on hand. Simply dice or shred it before mixing with the other ingredients.
- → How do I prevent the pita from getting soggy?
Baking the stuffed pitas helps maintain texture. The oven heat crisps the exterior while melting the cheese inside. Avoid overstuffing and serve immediately after baking for best results.
- → Can I make these ahead of time?
Prepare the filling up to 24 hours in advance and store refrigerated. Stuff the pitas just before baking to prevent sogginess. Leftovers reheat well in the oven or toaster oven.
- → What sides pair well with stuffed pitas?
A crisp green salad complements the rich filling perfectly. Greek salad, cucumber and tomato salad, or roasted vegetables work well. Fresh fruit makes a light dessert option.
- → Can I freeze stuffed pitas?
Yes, freeze unbaked stuffed pitas individually wrapped. Thaw overnight in the refrigerator, then bake as directed. Cooking time may need slight adjustment for frozen items.
- → How can I make this dairy-free?
Substitute Greek yogurt with dairy-free yogurt alternative, use vegan mayonnaise, and replace mozzarella and Parmesan with dairy-free cheese shreds. The flavor profile remains similar.